A Practical Guide to Yeast Repitching
Introduction
When most brewers are starting out, they rely on dry yeast cultures for the bulk of production. Dry yeast is very easy to use, and affordable to the point that it does not need to be reused. However, as breweries and brewers grow, they often find themselves seeking out the wider range of flavours available through liquid yeast cultures, or the other benefits of liquid yeast slurry reuse such as faster and more reliable fermentations.
Why should I reuse my yeast?
Reusing yeast presents possible benefits to both the brewer and the owner. The most obvious reason to reuse yeast is to reduce the cost of each brew. There are several other practical benefits to reusing yeast within the brewery - many yeast strains exhibit increased fermentation performance, flocculation, and enhanced flavour compound production when reused (repitched). This improvement is most often observed in the 2nd to 3rd generation of the yeast. For reference, the 2nd generation of a culture is the yeast resulting from the first batch of beer made with the initial pitch.
What are the downsides to reusing yeast?
If performed correctly, there are no downsides. However, poor/incorrect practices in yeast management can cause problems. The most notable issues are Contamination and Yeast Health & Pitching.
Contamination: If a beer is contaminated, then the yeast culture will also be contaminated. If you harvest the contaminated culture and use it to inoculate another batch, then the contamination will be present in the repitched beer. Sources of contamination can be from process, equipment failure, or contaminated ingredients (fruit, etc).
Yeast Health & Pitching: Ensuring healthy yeast is critical for brewers. Without a microscope and viability stain, it is not possible to directly assess the quantity and quality of a yeast culture. As a general rule, it is always better to overpitch than underpitch since underpitching is more likely to produce unpleasant flavours than overpitching.
Escarpment Laboratories recommends using proper microscope technique to count and analyze your yeast culture and can advise where to acquire the equipment to do so.
There are 3 main stages of Yeast Management
-
Yeast Cropping: Harvesting yeast from the prior fermentation
-
Yeast Storage: storing the yeast before the next fermentation
-
Pitching: Adding the cells into the next ferment
Stage 1: Yeast Cropping

Understanding the Layers
Yeast is often cropped from the bottom of the conical fermentor cone after fermentation and cooling to ensure that fermentation has come to completion and cells have flocculated out of the beer and sedimented at the bottom. This practice ends up producing “3 layers” within the yeast cone which need to be managed. Layer 1 is the Trub/Dead Yeast at the bottom which contains trub (protein) which precipitates from the wort during fermentation, as well as the earliest flocculating yeast. This portion of the cone is normally darker brown to beige in colour and is typically dumped from the cone before harvesting. Layer 2 is the Ideal & Healthy Yeast which is composed of healthy, fit for fermentation and dense to moderately dense culture. This region will be a light beige to tan in colour in lighter beers. This is the section of the cone you will harvest. Layer 3, the top layer, is the Poor Flocculating and Thin Yeast which is normally less useful for repitching.
Methods for removing the yeast
Removing the yeast from the tank is easy, however there is one variable you must keep in mind to ensure enough cells can be harvested. Tunneling is when the yeast cake does not slide into an opening below the cone and instead forms a passage in which beer begins to travel through causing a loss of beer and a reduced yield of yeast. Tunneling is more prominent in some yeast strains and is impacted by tank design and cleaning regime.

Best practices for yeast cropping:
Method 1 - crop very slowly, allowing for gravity to induce tunnel collapse. This method is slower and does not ensure as complete of a crop, but it is much easier in practice.
Method 2 - remove the beer from the top of the cake via a racking arm or standpipe and then remove the yeast cake (this process is often benefited with CO2 agitation after beer has been removed). This ensures near-complete removal of the yeast cone however more labour is required. If you have yield problems with method 1, then we recommend method 2.

Collecting the yeast into a brink
Now that you are ready to harvest you need a vessel to hold the yeast - commonly called a brink. A yeast brink is simply an easily sanitizable container used to contain the cropped yeast under CO2 but not under extreme pressure. This can be as simple as a clean and unscratched sanitized plastic bucket, a stainless steel bucket with tight fitting lid, a converted Cornelius or Sanke keg up to expensive custom built sanitary brinks.
Pro tips for yeast cropping
-
Yeast slurry contains CO2 which causes the yeast to expand/foam. It is never recommended to fill a brink to the top to account for expansion/foaminess.
-
If tunneling occurs, stopping the flow and allowing for settling will mitigate the issue. Make sure while settling occurs that the end of the collection hose is capped or shut and the brink is covered/free of environmental contamination.
-
When removing yeast from a tank it is always recommended to ensure 1-4 PSI of CO2 head pressure to ensure a vacuum or oxidation of beer does not occur.
Stage 2: Yeast Storage
How to Store Yeast
Once yeast is collected, the slurry must be kept cold (we recommend between 0ºC and 4ºC) and away from oxygen and light. While in storage it is important to prevent yeast stress:
-
Head Pressure - Yeast should not be stored under excess CO2 pressure. If using a pressurized brink, we recommend 5psi at most.
-
Oxygen contact - Oxygen is a trigger for the cells to reenter respiration and leave dormancy. Exposing cells to oxygen will prime the cells for fermentation before it occurs, reducing the lifespan of the cells.
-
Alcohol - Alcohol will stress out yeast cells and due to this it is normally recommended to harvest yeast from beer in the 4-6% ABV range.
Can I store yeast in the cone of my fermentor?
If your fermentor has glycol jackets on the cone, yes you can. A brink is recommended as the additional hydrostatic pressure from the liquid above the tank, residual CO2, low nutrients, higher alcohol and hop/trub content of the cone make it a poor place for yeast to remain dormant. Harvesting the cells into a brink is recommended to reduce these issues.
How long can I store my yeast?
The main question everyone has when storing yeast is: “how long can I store my yeast before it is no good”
This question is best answered when you relate it to food. If you asked “how long is my soup in the fridge good for” the answer is always “sooner is better”; same goes for yeast.
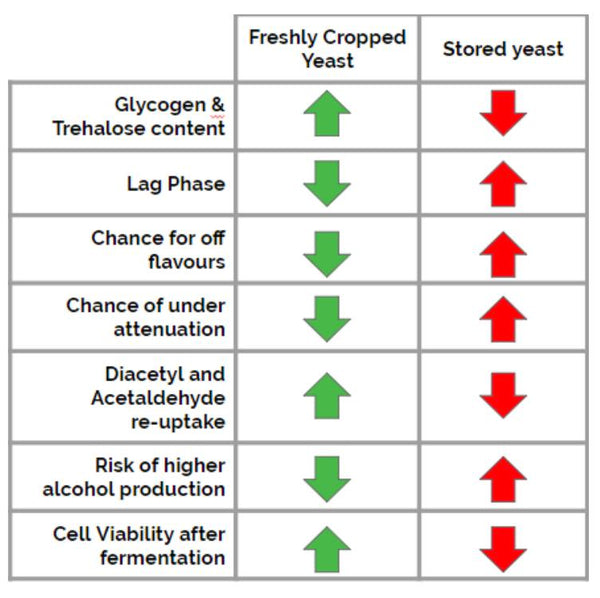
To explain why, you must realize that yeast is not frozen or inactive while refrigerated - it is still alive and still consuming its own nutrient reserves. Yeast cells have two main nutrient reserves - glycogen and trehalose. Glycogen is the main starvation nutrient source, while trehalose helps support cell membrane integrity to ensure physical stability.
Dormant yeast cells will consume these nutrients, meaning that the longer you store your cells, the less nutrients the cells will have when they are added to the next fermentation. Cells with low nutrient reserves when pitched have a higher risk of producing off-flavours and/or stuck fermentations and due to this it is always recommended to use the yeast as soon as possible. Different yeasts will be impacted by storage different. Yeast strains like Saisons can be stored for long periods of time while other strains such as Lager yeasts cannot. Using the yeast sooner is always better.
When do I know when the yeast is no longer useful?
This is very strain-dependent, some yeasts can perform well even with low viability. We recommend using a microscope and viability stain to determine viability. If the culture is less than 70% viable it is likely time to dump the yeast.
Stage 3: Pitching Yeast
How to pitch yeast and how much to use
How you pitch yeast is going to be based on what vessel you are storing the yeast in - kegs are great for this reason as you can push the yeast with CO2; It is important to depressurize the remaining yeast after use. If using buckets that cannot be pressurized, then your options become limited to pouring yeast into the fermentor via a manway.
There are 2 main ways brewers pitch yeast:
-
Pour yeast into the ferment (before or after wort is present)
-
Inject yeast into the brew during transfer
Method 1: pouring yeast into the fermentor
This is the most common method for small breweries as it is simple, does not require a complex system or stainless and allows for sanitary buckets to be used instead of a costly yeast brink. There are a few measures that must be taken into account for this method so that you do not harm the cells.
If adding yeast before knocking out make sure your wort cooling is on max and slowly bring the wort online. If wort cooling is not on or is not sufficient as soon as wort enters a yeasted fermentor the wort will heat and kill some or all of the yeast. A way to consistently get around this is to add your yeast after the tank has been filled. However, if the fermentor does not have a top manway or your yeast pitch is large, then this becomes challenging and/or dangerous.

Method 2: inject yeast in the brew during transfer
This is the most common method for adding yeast to large tanks of wort. To do this you must pressurize the yeast brink, attach a valve to the brink and connect it to the chilled wort entering the fermentor. It is recommended for this applications that a pump is not used however if unavoidable a positive displacement or diaphragm pump are appropriate.
To ensure flow it is important to pressurize the brink to the proper PSI; if your pump places 10PSI onto the line and your brink is pressurized to 10PSI then no yeast will leave the device. If no yeast is leaving then it is recommended you increase the pressure on the brink. A scale is normally used to measure the amount of slurry entering the wort - as the slurry is removed the weight will decrease allowing for controllable pitching.

How much yeast should I pitch?
In order to determine the amount of yeast to add to the tank we need to first determine a few parameters of the yeast - Its viability and its concentration. Viability is the % of the cells within the population that are alive. For example, if I have 100 cells but only 90 of them are alive then culture is 90% viable.
Concentration is the quantity of cells per mL of slurry. This is important as different cultures will flocculate more or less intensely resulting in different slurry thicknesses.
For example, English strains will becomes much clumpier and dense than Lager strains. If we are working with a thin slurry then we will have to add more litres of slurry to equal the same cell count of a thick slurry.
The general rule of thumb is 1L of slurry per hL of beer, however this is not an accurate measure as it does not take into account viability or cell concentration. For these reasons cell counting is highly recommended as part of the brewery yeast management program. We have built a handy pitching rate calculator to take most of the mental gymnastics out of the equation.
How much yeast do I use?
The amount of cells you need to add for a brew is going to be different for each brew. A formula for the amount of cells needed for a ferment is given below:
0.5-1.25 million cells/mL/⁰P
With this equation we can see that the larger the volume of wort (mL) the more cells we are going to need. As we increase the gravity of the brew we will also need more cells. The rule of 0.5-1.25 million cells is based on what you as a brewer are trying to do and how the strain you are working with operates. In general English and Belgian strains are comfortable at the lower end of the range, while high gravity beers and Lagers should be pitched at the high end of the range, especially when repitching.
What else can/should I do while pitching yeast?
When repitching yeast it is very important to oxygenate your wort just before or during yeast pitching. Oxygenation is commonly performed with a sintered stone in the wort stream between heat exchanger and the fermentor. The biggest problem that occurs with this process tends to be a lack of a flow meter for oxygen gas volume determination; normally a PSI gauge is all that is present. We strongly encourage brewers invest in a basic flow meter as this will allow for more precise control of this critical wort production parameter.
Should I wash my yeast?
A common technique in many breweries is acid washing for the removal of potential brewery contaminations from the yeast culture. Resources for yeast washing can be found online, and typically involve exposure to phosphoric acid or chlorine dioxide to help reduce bacterial load. In general, if good sanitation practices are followed and yeast reuse is limited to 10-15 generations, yeast washing is not necessary, and can impact the quality of some yeasts not adapted to the practice (e.g. non-English yeast strains).
What beers should I harvest beer from?
You should only harvest yeast from beers that turned out the way you wanted them and are free of fermentation off-flavours. If the beer has noticeable off-flavours, do not collect yeast from that tank. Additionally, yeast should not be harvested from sour beers as the low pH environment is non-ideal for yeast health. Likewise for high-ABV beers, the yeast may be in poorer condition following the higher stress conditions.

Conclusion
Using the information in this guide, any brewer should be able to familiarize themselves with the best practices and practical considerations to yeast repitching. Yeast repitching, when implemented properly, can reduce costs if yeast is used for multiple, and significantly reduce tank time, which also creates greater operational efficiency in the cellar.
Learn More On YouTube:


